In my previous blog post I covered how I usually set up new .Net projects. The post covered both naming convention, .Net Standard and .Net Core.
In this post I will show a four ways you can share code between .Net projects and Unity 3D projects.
There are several good reasons why you would like to do this. It can for example be the sharing of libraries between client and server software, debug components in isolated tests, use more of Visual Studio and architecture.
Unitys big ball of mud
Unity 3D allows you to write in C#, but it does not cater for a good structure. In fact, many of the developers I’ve seen take a straight on approach of attaching scripts to objects, communicating between scripts and having “Managers” handle central things. This will to some extent work, but its easy to get lost in a big ball of mud.
A big ball of mud is a software system that lacks a perceivable architecture. Although undesirable from a software engineering point of view, such systems are common in practice due to business pressures, developer turnover and code entropy. They are a type of design anti-pattern.
Wikipedia
Many new to Unity will find tutorials showing them how to create scripts attached to objects, doing work in Update(). This means that you are by design encouraged to write single-threaded application with business logic spread and interwoven with display logic. Unity does not help in that it generates the csproj-file for you, and it won’t let you reference external projects. All files becomes one csproj-file.
As with any software project, a minimum of architecture can help. We have mountains of patterns and best practices that can be employed, even in Unity projects. For instance splitting code into multiple libraries to enforce strict dependency direction, sharing libraries between client and server, test driven development, presentation decoupling, and much more. We want the whole shebang.
Setting up sample project
For sample project we will set up a Unity client and .Net Core Console server, and share a library between hem.
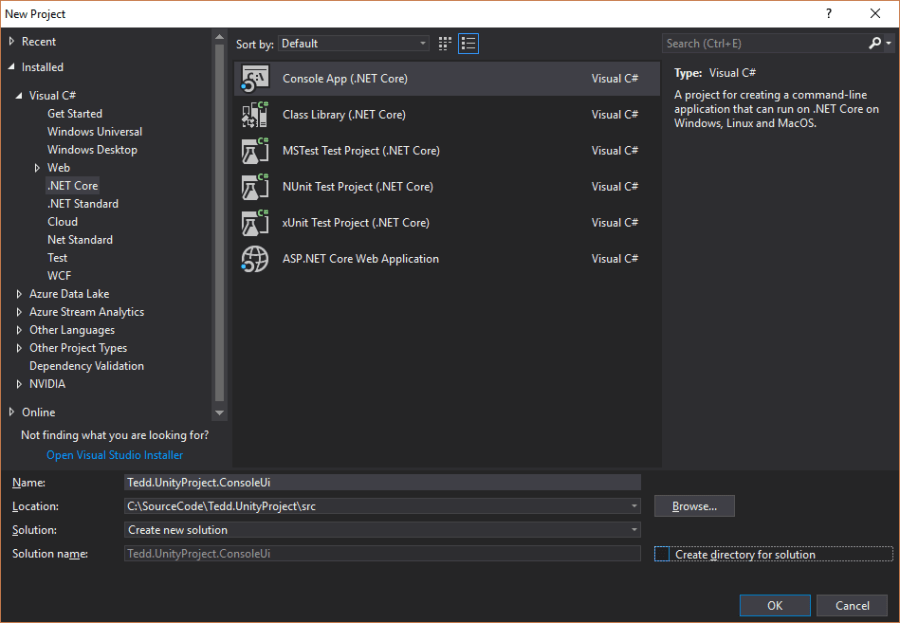
Create .Net Core console application
Location: C:\SourceCode\Tedd.UnityProject\src
This is the executable for our server.
Note: You may want to uncheck “Create directory for solution” as that would add another level under src, which is not required.
Create Unity project
IMPORTANT NOTE: The length of your project path easily adds up. It is important that it does not exceed 260 characters. Is is therefore advisable to use smaller solution name than what I have used here. With the name I used here I had to redirect bin/obj folders in option 4 to a shorter name, such as C:\Temp\Compile instead.
Location: C:\SourceCode\Tedd.UnityProject\Unity

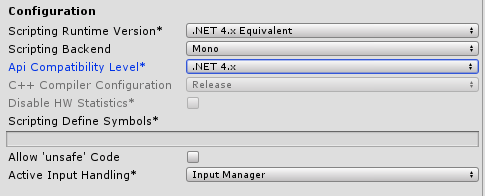
To support any recent code in your shared project you will need to set Unity to use .Net 4.6:
Go to File->Build settings->Player Settings…
Under “Other settings” make sure “Scripting Runtime Version” is set to “.Net 4.x Equivalent”, and optionally set “Api Compatibility Level*” to “.Net Standard 2.0”.
Mocking UnityEngine
In some cases you need to share Unity datatypes. Inside Unity you have access to UnityEngine, but in Visual Studio server project you do not have that. To add this you need to provide reference to UnityEngine in the shared projects. You can add a reference directly to something like: C:\Program Files\Unity\Editor\Data\Managed\UnityEngine.dll
Or if you want to be able to debug into Unity code you can grab a copy of Unity’s source code on GitHub and add as a project into your solution. Just remember that there are license restrictions on use/distribution.
Option 1: Compile shared .dll to Unity Assets-folder
The setup for this is described here.
This may be the most straight forward setup. You simply set your Visual Studio project to compile its .dll directly into Unity Assets-folder. Either by changing the output directory, adding a post-compile script to copy file or copying it manually.
There are some notable drawbacks to this approach.
- Requires you to recompile server solution any time you want Unity to pick up changes.
- You will not have access to .cs-files from Unity Visual Studio.
- Having Unity Visual Studio open will reference the .dll-file, in some cases causing file locking.

In project properties you change “Output path” to put compiled files into “Assets\Libs”-folder under your Unity project.

Note use of relative path ..\..\ instead of full path.
Option 2: Add file link
In csproj-files you can add a link (as opposed to add existing file), this would allow you to have a .cs-file inside Unity folder, while also sharing this file in your server project.
The problem with this approach is that you have to maintain all .cs-file links manually. If you add one file it has to be done in Unity, then link up in Visual Studio.
Create new sample project

Right click project, select “Add” and “Existing Item…”. Browse to relevant .cs-file under Assets-folder, click down-arrow besides Add-button and select “Add As Link”.

Solution Explorer will now show file with a special icon indicating it is a link to external file.

Option 3: Add folder
In old csproj-file all project files were added to csproj-file by Visual Studio. You could manually include and explde files. In the new csproj-file you can choose to include a whole folder of files.
Attempting to add ItemGroup Folder Include did not work. There is however an alternative approach to this using filesystems Directory Junction feature. For Mac/Linux you would use Symbolic Link. In essence this will give two names to a single directory. If you modify one, you automatically modify the other – because they are the same.
The drawback here is that you need to do this to every folder you want to share. Though subfolders are automatically shared. Also the directory junction will not b

Create a folder to share with Unity project.

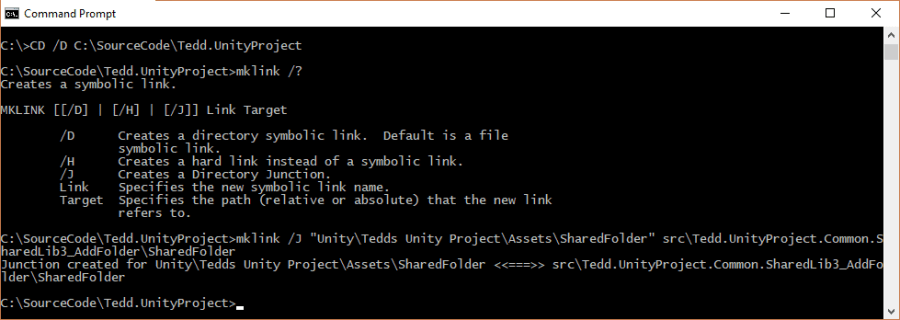
Start CMD and set up junction
|
1 2 |
CD /D C:\SourceCode\Tedd.UnityProject MKLINK /J "Unity\Tedds Unity Project\Assets\SharedFolder" src\Tedd.UnityProject.Common.SharedLib3_AddFolder\SharedFolder |
Option 4: Solution references
If you have every tried to put whole project folders directly under Unity Asset folder you may have discovered a couple of things. AssemblyInfo.cs-file from two projects will conflict with each other, and if you compile (even if you change output directory) Unity will complain about duplicate code because of same namespace/classes in source, .dll and obj-folder.
So we can’t just create new project and point the ones we want to share directly into Assets-folder and assume it works. To make this work we need to do a little bit more work.
First off, we need to use .Net Standard or .Net Core project types. Since we need to be compatible with Unity then .Net Standard 2.0 is a perfect match. This will eliminate AssemblyInfo.cs and thus remove our first obstable.
So we create a new .Net Standard project into Assets-folder. This will create a folder there with name of project, and under here project will be located.

We create another one just to test with two.

If we compile the solution, switch to Unity and attempt to run the project we will get some errors.
|
1 |
Assets/Tedd.UnityProject.Common.SharedLib4_SolutionRef/obj/Debug/netstandard2.0/Tedd.UnityProject.Common.SharedLib4_SolutionRef.AssemblyInfo.cs(14,30): error CS0579: The attribute `System.Reflection.AssemblyCompanyAttribute' cannot be applied multiple times |

This is because we are putting both obj and bin-folders in under Assets when we compile, causing Unity to include all of these into the project.
Change bin-folder is done by modifying Output-folder to put files outside of Unity-folder. This can be done as shown above using project properties, or by modifying the csproj-file directly. Right-click it and add this before </Project>.
|
1 2 3 4 5 6 7 8 9 10 11 |
<PropertyGroup Condition="'$(Configuration)|$(Platform)'=='Debug|AnyCPU'"> <OutputPath>$(MSBuildThisFileDirectory)..\..\..\..\src\bin\$(Configuration)\$(MSBuildProjectName)\</OutputPath> </PropertyGroup> <PropertyGroup Condition="'$(Configuration)|$(Platform)'=='Release|AnyCPU'"> <OutputPath>$(MSBuildThisFileDirectory)..\..\..\..\src\bin\$(Configuration)\$(MSBuildProjectName)\</OutputPath> </PropertyGroup> <PropertyGroup> <DefaultItemExcludes>$(DefaultItemExcludes);*.meta</DefaultItemExcludes> </PropertyGroup> |
This will redirect bin-folder, but we also need to redirect obj-folder. To do this we need to instruct MSBUILD. This is done by creating a Directory.Build.props-file with this content:
|
1 2 3 4 5 |
<Project> <PropertyGroup> <BaseIntermediateOutputPath>$(MSBuildThisFileDirectory)..\..\..\..\src\obj\$(Configuration)\$(MSBuildProjectName)\</BaseIntermediateOutputPath> </PropertyGroup> </Project> |
(PS! You may want to double-check if we got all those ..\..\..\ right by checking where files end up when you compile.)
Finally, and this is important, we need to delete the “bin” and “obj” folders from project folders under Unity Assets. If not we’ll continue getting duplicate errors.
Delete bin and obj folders from both project folders:
- C:\SourceCode\Tedd.UnityProject\Unity\Tedds Unity Project\Assets\Tedd.UnityProject.Common.SharedLib4_SolutionRef
- C:\SourceCode\Tedd.UnityProject\Unity\Tedds Unity Project\Assets\Tedd.UnityProject.Common.SharedLib5_SolutionRef
Recompile server project in Visual Studio. Unity should now run with the shared projects, and without complaining.
Summary
I have presented four different methods of sharing code between a Unity project and an external Visual Studio Solution.
I prefer option 4. It takes a couple of minutes extra to set up initially, depending on how well you know your relative paths. Then it’s simply a copy-paste on new shared projects. The advantage is that there is no maintenance once its set up.